Monday, April 14, 2014


TATTOO BEANIE
Crochet Pattern

Tutorial Link-https://www.youtube.com/watch?v=4qytQdz9KYU
MATERIALS:
Worst weight yarn like Red Heart Super Saver,
Color I have use are Black, Red White and Grey.
Hook Size: 4.5mm for child size or 5.0mm for adult size beanie.
Scissor
Yarn Needle

STITCHES:
dc-double crochet
sl- slip stitch
sc-single crochet
ch-chain
st- stitch
hdc- half double crochet
trc-triple crochet
sp- space

Tattoo Beanie

Black yarn or the color of your choice.

Chain 4

Row 1-11 dc in the first ch, sl st in the top of ch 4 to join.

Row 2- Ch 2, dc in the same st as ch 2. 2 dc in each of the next st. sl st to of ch 2.

Row 3- Ch 2, dc in the same st as ch 2,  (dc in next st, 2 dc in the next) repeat around. Sl st top of ch 2 to join.

Row 4- Ch 2, dc in the same st as ch 2, ( dc in the next 2 sts, 2 dc in the next) repeat around. Sl st top of ch 2.

Row 5- Ch 2, dc in the same st as ch 2, ( dc in the next 3 sts, 2 dc in the next) repeat around. Sl st top of ch 2.

Row 6 to 15- Ch 2, dc in each st around. sl st top of ch 2.

Fasten off.

Change color for boarder. I am using Grey.
Row 16- Attach yarn, ch 1, hdc in each st around. sl st to join and fasten off. sew in ends.

HEART

Using Red yarn.

Row 1-  Ch 12, sc in the 2nd ch from the hook. Sc across. Ch 1 turn.

Row 2 to 10- sc in the as the ch and sc across to end ch 1 turn.

Row 11- Working on the center of the edge. 10 trc in the center. sl st in the croner of the other edge. Working on the other side 10 trc in the center. sl st on the edge of the coner. Fasten off.

RIBBON

Using White yarn.

Ch 22

Row 1- sc in the 2nd ch from the hook. Sc across leaving the last ch undone. Turn.

Row 2- Skip first st. sc across leaving last st undone. Turn.

Row 3- Repeat Row 2.

Row 4- Ch 1, 2 sc in the same as ch 1 sp. sc across. 2 sc in the last st. Ch 1 turn.

Row 5 to 6- Repeat Row 4.

Fasten off..

The Lettering. Word Mom

Ch 15 for the the M's
Ch 12 for the O.
Leave a long tail for sewing on.

Tuesday, February 11, 2014

Crochet Pattern for Keychain Hearts


Tutorial https://www.youtube.com/watch?v=D5x1wp8MhU4

Crochet Pattern for Keychain Hearts.

Material
4.25 mm hook or a G hook
2 colors of your choice of Red Heart Super Saver Worst Weight Yarn.
Keychain rings.
scissors

Stitches
Ch- chain
Sc- Single Crochet
Dc- Double Crochet
sl- slip stitch

Heart make 2
Chain 6
Row 1 - sc in the 2nd ch from the hook and sc in each ch to the end. turn
Row 2 to 4 - ch 1, sc in the same st as the ch. sc across. Turn 
Row 3 Working on the left side of work in between the rows of the 2nd row crochet 5 dc at the edge.  st in the corner.
Row 4 Working on the other side 5 dc in the 3rd st. sl in the corner. Fasten off.

Put the 2 hearts start from the top sc around in both of the stitches of the hearts. When you get to the top middle part of your heart ch 12. Fast off with a tail and insert you keychain ring in the hook of the chain. sl in the bottom of your first sc. tie the two ends and cut the ends. All Done! Enjoy.

Monday, December 23, 2013


Crochet Dora Beanie Pattern

Material-
Size child from ages 1 to 5 years of age use 4.5mm hook 
Size 5 to 12 years of age use a 5mm hook
Adult use 5.5 mm hook
Yarn Needle
button
Yarn- Red Heart Super Saver Worst weight. Colors Buff, White, Black, Dark Brown and Pink or purple for the the bow.

Beanie Use Buff color yarn.

Row 1: Ch 4, 11 dc in the first ch and sl st.
Row 2: Ch 2, dc in the same st as the ch. 2 dc in each st across, sl st
Row 3: Ch 2, dc in the same st as the ch. (dc in the next, 2 dc in the next) repeat across and sl st.
Row 4: Ch 2, dc in the same st as the ch. (dc in the next 2 st, 2 dc in the next) repeat across, sl st.
Row 5: Ch 2, dc in the same st as the ch. (dc in the next 3 st, 2 dc in the next) repeat across, sl st.
Row 6 to 13: Ch 2, dc in each st across, sl st.
Row 14: Ch 1, hdc in each st across, sl st. fasten off.

Dora Hair Dark Brown Yarn

Row 1: Ch 4, 11 dc in the first ch. sl st.
Row 2: Ch 2, dc in the same st as the ch. 2 dc in each st across. sl st.
Row 3: Ch 2, dc in the same st as the ch. (dc in the next st. 2 dc in the next) repeat across. sl st.
Row 4: Ch 2, dc in the same st as the ch. (dc in the next 2 st, 2 dc in the next)
repeat across. sl st.
Row 5: Ch 2, dc in the same st as the ch ( dc in the next 3 st, 2 dc in the next) repeat across. Do Not sl st to join.
Row 6: Ch 2, turn dc in each st across.
Row 7: Ch 1, sl st in the next 11 st. Ch 2, dc in the same st as the ch. dc in the next 37 st. ch2, turn.
Row 8 to 13: Dc in the same st as the ch. dc in each st across 
Fasten off 
Sew over the beanie Buff lining it up from top to bottom.

Eyes. Make 2 Use black and white yarn.

Row 1: Ch 4, 11 dc in the same st as the ch. sl st. fasten off.
Row 2: attach white. Ch 1, sc in the next, hdc in the next, 3 dc in the next, hdc in the next, sc in the next 3, hdc in the next, 3 dc in the next, hdc in the next, sc in the next 2 and sl st. fasten off. sew on to beanie.
Sew with the white yarn a little line in the center of the black to make affect of the glare in the eye.


Nose use the dark brown yarn 
Ch 6 and sew on.

Mouth use pink.
ch 15 sew on

Bow use pink or purple.
Row 1: Ch 12, sc in the 2nd ch from the hook, sc across.
Row 2 to 8: Ch 1, Turn . Sc across. 
Fasten off
In the center of the bow take a piece of yarn and tie it to close the center to form the bow. sew on the button and then sew it to the side of dora's hair.

Bottom Boarder of the beanie use purple or pink yarn.
Hdc across going into all the st of the Dark brown and the buff. sl st. fast off.

Tuesday, November 19, 2013

Basic Double Crochet Beanie Pattern

By Sabrina N' Omar on Friday, October 19, 2012 at 5:36pm

young child size age 5 to 10
material.
I/ 5.5mm hook
worst weight yarn.
yarn needle
Row 1
Ch 3, 12 dc in the first ch, sl join.
Row 2
Ch 2, in the same st as the ch 2, dc, next st 2 dc, 2 dc in every st. sl join
Row 3
Ch 2, in the same ch 2 st. dc. (next st dc, next st 2 dc) repeat all around. sl join.
Row 4
ch 2, in the same ch 2 st. dc. (next 2 st dc, next st 2 dc) repeat all around. sl join.
Row 5
Ch 2, in the same ch 2 st. dc (next 3 st dc, next st 2 dc) repeat all around. sl join.
Row 6
Ch 2, in the same ch 2 st. hdc (next 4 st dc, next st 2 dc) repeat all around. sl join.
(For Adult size only)- You will increase here. You will crochet (next 5 st dc, next st 2 dc)for your next row and the contiune the from row 7 to 26.
Row 7
Ch 2, dc all around and sl join.
Row 8 to 26 for child and row 30 for adult.
Repeat Row 7. fasten off. sew in your loose ends with the yarn needle.

Tuesday, October 29, 2013

Tiger Beanie

By Sabrina N' Omar on Sunday, March 10, 2013 at 12:45pm

Tiger Beanie
Created by, Sabrina N Omar
Written by, RayandMaria Steele
Tutorial LInk: https://www.youtube.com/watch?v=PyJ7EncMHr4
Materials
Orange, White and Black (Red Heart Super Saver works best)
5.00mm Hook Child size
5.50 mm Hook Adult size
2 buttons (1”)
Notes:
For this pattern you always start a new round switching colors before joining with a sl st.
Ch 3 counts as your first DC
Starting on round 5 to 16, DO NOT DC in the last st
Pattern
Round 1 (Orange)
Ch 4, 11 dc into ch 1, join with sl st to top of ch 4 (12sts)
Pull string to tight the circle
Round 2 (Black)
Ch 3, dc in the same st as ch 3, * 2 dc in the next st (24 sts)
*repeat from; join with sl st to top of ch 3
Round 3 (Orange)
Ch 3, dc in the same st as ch 3, dc in the next st * 2 dc in the next st, dc in the next st
*repeat from; join with sl st to top of ch 3
Round 4 (black)
Ch 3, dc in the same st as ch 3, dc in the next 2 st * 2 dc in the next st, dc in the next 2 st
*repeat from; join with sl st to top of ch 3
Remember that starting on the next round until round 16 do not dc in the last st
Round 5 (Orange)
Ch 3, dc in the same st as ch 3 * dc in the next st
*repeat from join with sl st to top of ch 3
Round 6 -14
Same as round 5
At the end of round 14 cut the black yarn and stay just with the orange to finish the last round
Round 15 (Orange)
Ch 1, hdc in the same st as ch, *hdc in the next st
*repeat from; join with sl st to top of ch 1
Round 16 (Orange)
Same as round 15
At the end of round 16 fasten off, wave in ends
EARS (make 2)
Orange Yarn
Row 1
Ch 12, sc 2nd ch from hook, sc in each st across, turn your work around
Row 2
Skip the 1st sc you made and sc in the 2nd sc and each st across, turn your work
Row 3 to 9
Repeat row 2 until you have one st left
Leave a long tail for sewing
Black yarn
Row 1
Ch 8, sc 2nd chain from hook, sc in each st across, turn your work

Row 2
*Skip the 1st sc you made and sc in the 2nd sc and each st across, turn your work
*Repeat until you have one st left
*Sew them together (2 rows orange, 1 row black)
*See Sabrina’s you tube video on how to sew them http://www.youtube.com/watch?v=PyJ7EncMHr4
Snout (white, make 2)
Round 1
Ch 4, 11 dc into ch 1, join with sl st to top of ch 4
Round 2
Ch 3, dc in the same st as ch 3 * 2 dc in the next st
*repeat from; join with sl st to top of ch 3
Round 3
Ch 3, dc in the same st as ch 3 * dc in the next st
*repeat from, do not dc in the last st. Join with sl st to top of ch 3. Fasten off leaving a long tail for sewing
Nose (Black)
Row 1
Ch 12, sc 2nd chain from hook, sc each st across, turn your work
Row 2
Skip 1st sc, sc in the next st and each st across
Row 3-9
Repeat row 2
Row 10
Sc in each st all around until you have 3 sts left, sl st to the last 3 sts, fasten off
Sew all pieces together as seen in Sabrina’s video
https://www.youtube.com/watch?v=PyJ7EncMHr4

LADYBUG HANDBAG PATTERN

By Sabrina N' Omar on Monday, October 15, 2012 at 2:00pm

LADYBUG HANDBAG PATTERN
Tutorial found here:https://www.youtube.com/watch?v=itOSjE4AZWk
Stitches-
SC- Single Crochet
SC Dec- single crochet Decrease


Materials:
Red Heart Super Saver worsted weight yarn Black and Cherry red.
Size I/9-5.50mm hook
Tapestry Needle
2 buttons
Stitch Marker

Purse side (make 2)
ROW 1- With Cherry red, ch 19, sc in 2nd ch from hook, sc in each rem ch across, turn. (18 sc)
ROW 2- Ch 1, 2sc in first sc, sc in each sc across to last sc, 2 sc in last sc, turn. (20 sc)
ROW 3-8- Rep Row 2.
ROW 9- Ch 1, sc in each sc across, turn.
ROW 10-25- Rep Row 9.
ROW 26- Ch 1, sc dec over next sc, sc in each of next 8 sc, change to black, sc in each of next 12 sc, change to cherry red, sc in each of next 8 sc, sc dec over next 2 sc, turn.
ROW 27- Ch 1, sc dec over next 2 sc, sc in each of next 6 sc, change to black, sc in each of next 14 sc, change to cherry red, sc in each of next 6 sc, sc dec over next 2 sc, turn.
ROW 28- Ch 1, sc dec over next 2 sc, sc in each of next 4 sc, change to black, sc in each of next 16 sc, change to cherry red, sc in each of next 4 sc, sc dec over next 2 sc, turn.
ROW 29- Ch 1, sc dec over next 2 sc, sc in each of the 2 sc, change to black, sc in each of next 18 sc, change to cherry red, sc in each of next 2 sc, sc dec over next 2 sc, turn.
ROW 30- Ch 1, sc dec over next 2 sc, change to black, sc in each of next 20sc, change to cherry red, sc dec over next 2 sc, change back to black in last st, turn.
ROWS 31-34- With black, ch1, sc dec over next 2 sc, sc ineach sc across to last 2 sc, sc dec over next 2 sc, turn.
ROW 35-Now working in rnds, working in ends of rows and in each sc, changing yarn color as colors change on piece, ch 1, sc in each st around outer edge, join in beg sc, fasten off.
SPOT
RND 1- black yarn ch 3, join at the first ch, in the circle 12 sc, join first sc, fasten off.
ASSEMBLY
Holding purse sides tog, starting at Row 26 on one edge and working through both thicknesses, sew sides tog, working down side, across bottom and up opposite side.
Center and sew buttons between Rows 32 and 33, 1 inch apart.
HANDLE
Note: Do not join rounds unless otherwise stated. Use a st marker to mark rounds.
RND 1-With black, ch 2, 6 sc in 2nd ch from hook.
RND 2-(sc in next sc, 2 sc in next sc) 3 times
RNDS 3-51- Sc in each sc around
RND 52- (Sc in next sc, sc dex over next 2 sc) 3 times, sl st in next st, leaving a length of yarn, fasten off,
With rem length, sew opening closed. Sew each end of handle to inner back of purse, centered over first and last sts of the head.

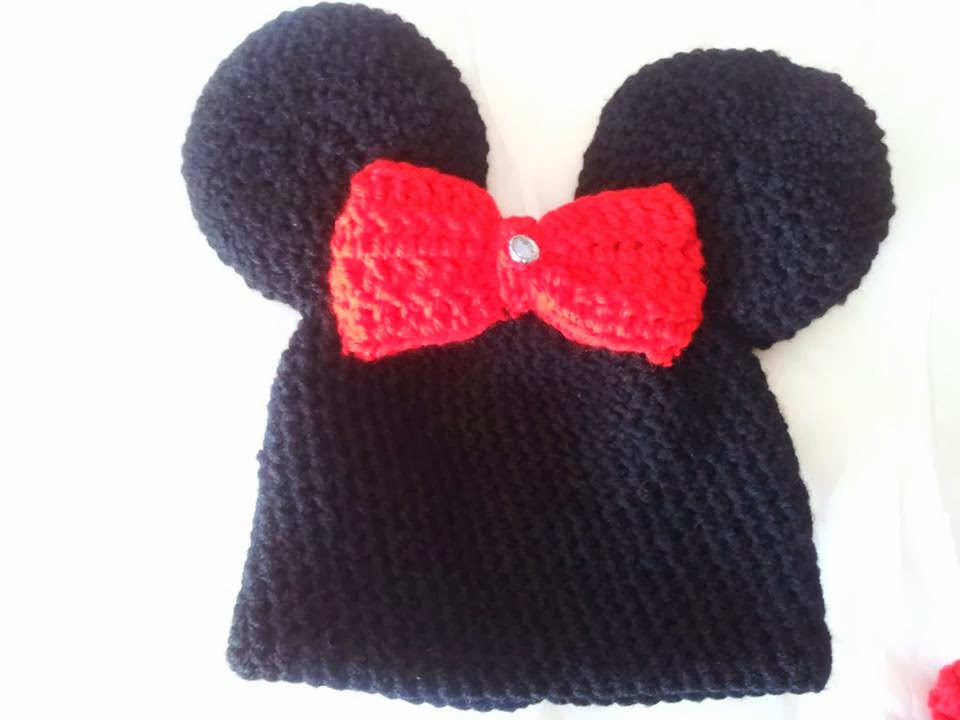
Minnie Mouse Newborn set. 
Hat, diaper cover with Skirt and Booties


 Tutorials are found here:Part one the hat: https://www.youtube.com/watch?v=2yDi_rOIGao, Part 2 the diaper cover https://www.youtube.com/watch?v=MOIJou9Yzyo, Part 3 the booties https://www.youtube.com/watch?v=5SUoZEvBizw
                                 

Supplies:
White WW Yarn
Black WW Yarn
Red/pink WW yarn
4mm hook for hat
5mm Hook for diaper cover and skirt
3mm hook for bootie
Tapestry needle
Crochet markers

Stitch Guide:
Ch- Chain
St- Stitch
Sl St- Slip Stitch
SC- Single Crochet
HDC- Half Double Crochet
DC- Double Crochet
HDC2tog- Half Double Crochet 2 together
DC2tog- Double Crochet 2 together
F/O- Fasten off
Stmkr- Stitch Marker
MC- Magic Circle

Minnie Mouse hat 


Supplies:
White WW Yarn
Black WW Yarn
Red/pink WW yarn
4mm hook for newborn size
4.55mm hook for 0-3month size
Tapestry needle
Crochet markers
Optional:
Fiber fill/loose yarn ends
Button for center of bow

Stitch Guide:
Ch- Chain
St/s- Stitch/s
Sl St- Slip Stitch
SC- Single Crochet
F/O- Fasten off
Stmkr- Stitch Marker
MC- Magic Circle


Hat:
This hat is worked in the round, do not slst to join unless otherwise told.
With black make a magic circle, Ch 1
1. Work 12 SC into MC, pull tight
2. Place marker at the beginning of every around place 2 Sc in each stich around
3. Sc in each st around
4. 2 Sc in the next st, sc in the next, *2 Sc in next, 1 Sc in next Repeat from * around to the end.
5. Sc in each st around
6. 2 Sc in next, 1 Sc in the next 2 St, *2 Sc in next, 1 Sc in next 2 St repeat from * around to end

7. Sc in each St around
8-20 Sc in each st around
F/O weave in ends.


Border:
It is up to you if you want a border around the bottom.
With red/pink attach with a Slst in any St, Sc in same stitch and around to the end. Slst to join
F/O weave in ends.


Ears: Make 2 or 4

If you wish to make the ears stiff you can crochet 2 ears together and stuff with either fiber fill or
loose yarn ends. If you plan to stuff the ears you will need to make 4. If you do not plan to stuff
you only need to make to.

With black make a Magic Circle Ch 1
1. 12 Sc in MC, pull tight
2. Sc in next St place Stmkr Sc in same St, 2 Sc in each st around to the end
3. Sc in each St around
4. Sc in same St, 1 Sc in next 2 Sts, *2 Sc in next St, 1 Sc in next 2 Sts repeat form * around to
the end.
5. Sc in each St around

F/O leave tails Long. Sew in inside tails.

To Stuff place wrong sides together and sew together leaving a small opening to stuff with either
fiber fill or loose thread pieces. You only want to minimally stuff, you want it to remain a little flat
but just enough to have it stand. Fill and finish sewing closed and sew in ends. Repeat with other
ear.

Lay hat and ears flat and place them. Use a Stmkr to keep them in place and sew them onto the
hat. You want there to be about a 2 ½ -3 in space between, just eyeball to make sure it looks
alright.


Bow:
With Red/pink Ch 25.
1. Sc in 2nd
 chain from hook, Sc to the end. Ch 1 turn work
2. Sc in each St to the end, Ch 1 turn work
3-4. Repeat row 2.
5. Fold in ½ bringing the 2 ends together and slst together
F/O weave in ends.

Center for bow:
With red/pink Ch 6
F/O leaving a long end


Lay bow flat with the seam at the back and place the center for the bow on the center of the front
of the bow. Tie the 2 end pieces tight in the back and sew or cute ends. Fluff up bow.

Sew bow onto hat. You want to sew the bow to the ears and onto the top of the hat. Start at one
corner of the bow sewing on the ear, sew down and around to the other side of the ear. Weave in
ends.

Video tutorial can be found here:
http://www.youtube.com/watch?v=2yDi_rOIGao&lc=WSL4qQRkBJhyiyrbQyk6VzbSO
_gvLP-tda7k7b1VEhA


Minnie Mouse Diaper Cover and Skirt Set


Supplies:
White WW yarn
Black WW yarn
Red/pink WW yarn
5mm Hook
1 button
Tapestry Needle


Stitch Guide:
Ch- Chain
St- Stitch
Sl St- Slip Stitch
SC- Single Crochet
HDC- Half Double Crochet
DC- Double Crochet
DC2tog- Double Crochet 2 together
FO- Fasten off

Newborn size.
Diaper Cover:
With white chain 45
1. SC in 2nd
 chain from hook, SC to the end Ch 2 turn work.
2. DC in same St as Ch2 space (now and through out) DC to the end Ch 1 turn work
3. SC in same St, SC to the end Ch 1 turn work
4. Sl St in Ch1 space, Sl St in the next 9 (total 10) Ch 2 DC in NEXT st DC in the next 23
Ch 2 turn work
5. DC in same St DC to the end CH 2 turn work
6. DC2tog, DC to the last 2, DC2tog Ch 2 turn work
7. DC2tog, DC to the last 2, DC2tog Ch 2 turn work
8. DC2tog, DC to the last 2, DC2tog Ch 2 turn work
9. DC2tog, DC to the last 2, DC2tog Ch 2 turn work
10. DC2tog, DC to the last 2, DC2tog Ch 2 turn work
11. DC2tog, DC to the last 2, DC2tog Ch 2 turn work
12. DC across to the end. Ch 2 turn work
13-19 Repeat row 12
20. SC around the entire cover FO

Sew on button and weave in ends.

Skirt: worked on the back of the strap.
Turn your diaper cover around to where the back is facing you.

1. Attach Red/pink in front loop of the first ST on the right in the strap diaper cover
CH 1, 2 HDC in same St, still working in the front loop 2 HDC in each front loop of each
stitch to the end. Ch 2 turn work
2. DC in the same Ch 2 space, DC across to the end, Ch 2 turn work
3-6. Repeat row 2.

FO weave in ends.


Tail:
With black Ch 25
1. Sc in 2nd
 chain from hook, SC to the end.

Fasten off leaving a long tail to sew onto diaper cover.

Sew tail onto the center of row 6 of the diaper cover.

Polka Dots:

With white make a magic circle
6HDC in MC
Pull tight and Sl St in the top of the first HDC.

Fasten off

Make 12-16 polka dots.
Sew onto skirt in pattern of your choice.
.
Video tutorial can be found here:
http://www.youtube.com/watch?v=MOIJou9Yzyo


Minnie Mouse Crochet Booties


Supplies:

White WW Yarn
Black WW Yarn
Red/pink WW yarn
3mm hook for newborn size
3.55mm hook for 0-3month size
Tapestry needle
Crochet markers

Stitch Guide:
Ch- Chain
St- Stitch
Sl St- Slip Stitch
SC- Single Crochet
HDC- Half Double Crochet
DC- Double Crochet
HDC2tog- Half Double Crochet 2 together
F/O- Fasten off
Stmkr- Stitch Marker
MC- Magic Circle

You will be working in the round (DO NOT SS TO THE BEGINNING ST IN EACH ROUND
UNLESS TOLD TO)

-With Red/Pink Ch 12
1. Work Sc in 2nd ch from hook, Sc 7, Hdc , 2 Hdc in next st, 5 Hdc in last St. (Place Stmkr in the
3rd Hdc) Turn, now working across other side of chain. 2 Hdc in next st., Hdc, Sc 7, 2 sc in last st.

2. Work sc in the first sc from previous round. Sc 8, 2 sc in next st, Sc, 2 sc in next st, Sc (
Replace st mkr here), 2 sc into next st, Sc, 2 sc into next st, Sc9, 2 sc in each of the next 2 sts.

3. Work Sc in the first Sc from previous round, Sc 9, 2 sc into next st, Sc, 2 sc in next st, Sc, 3 sc
(Replace stmkr in the 2nd Sc), Sc, 2 sc into next st., Sc, 2 sc into next st., Sc 10, 2 sc in each of
the last 2 sts, SlSt in next st

4.Ch1,working in back loops Sc in same st as Ch 1, SC 18 , Sc ( Replace stmkr), Sc 22 ( you will
work into the joining st from the previous round), SlSt in 2nd Sc ( Skipping the Ch1-Sc beginning
st) F/O

Change yarn color to white on the next round. Count back 3 sts from where you F/O, and attatch
yarn. From here on out you will work sts normally, going through both loops.

5.Ch2 (counts as 1st Hdc) Hdc 13, HDC2tog, HDC, HDC2tog, Hdc (remove Stmkr) HDC (replace
Stmkr), HDC, Hdc2tog, Hdc, Hdc 2tog, Hdc in the last 13. Slst in first Hdc.

6.Ch2, HDC in the next 10, Hdc2tog, Hdc, Hdc2tog, Hdc, (remove Stmkr) Hdc (replace Stmkr)
Hdc, Hdc 2 tog, Hdc, Hdc2tog, Hdc in next 13, Slst to join.

7. Ch1 Hdc in next 7, Hdc2tog, Hdc, Hdc2tog, Hdc, (remove Stmkr), Hdc2tog (replace Stmkr),
Hdc, Hdc2tog, Hdc in last 9 St slst to join

8. Ch 1 Sc around to the end, Slst to join (remove Stmkr and replace)

F/O weave in ends.

Mouse Head: make 1
with black make a Magic Circle, Ch 3

11 DC in MC
pull tight and slst to top of Ch 3
f/o sew in or tie ends

Mouse ears: Make 2
with black make a Magic Circle Ch 2
11Hdc in MC
pull tight and slst to top of ch 2
f/o sew in or tie ends

Sew on the head (big circle) first then sew on the ears overlapping on the head just a tad bit.

Bow:
with red/pink Ch 6
1. Sc in 2n ch from Hook and in each ch to the end. (5 sc)
F/o leaving long tail to sew on.
cut a small 6-8in piece of pink yarn for the center of the bow.
Tie 6-8in piece onto the center creating the bow. Sew the bow onto the top of the head and
weave in ends.


Pattern and Photos by Sabrina.
Video tutorial can be found here:
http://www.youtube.com/watch?v=5SUoZEvBizw

Wrote by Megan lemon. If you find any mistakes please email me at
Andwegodancing@yahoo.com
Thank you.